Vue基础入门到实战5(自定义指令+插槽+路由入门)
1 自定义指令
1.1 简介
-
内置指令:v-html、v-if、v-bind、v-on… 这都是Vue给咱们内置的一些指令,可以直接使用
-
自定义指令:同时Vue也支持让开发者,自己注册一些指令。这些指令被称为 自定义指令。每个指令都有自己各自独立的功能
1.1.1 自定义指令
概念:自己定义的指令,可以 封装一些DOM操作,扩展额外的功能
1.1.2 自定义指令语法
-
全局注册
//在main.js中 Vue.directive('指令名', { "inserted" (el) { // 可以对 el 标签,扩展额外功能 el.focus() } }) -
局部注册
//在Vue组件的配置项中 directives: { "指令名": { inserted (el) { // 可以对 el 标签,扩展额外功能 el.focus() } } } -
使用指令
注意:在使用指令的时候,一定要 先注册,再使用,否则会报错
使用指令语法: v-指令名。如:<input type="text" v-focus/>注册 指令时 不用 加 v-前缀,但 使用时 一定要 加v-前缀
1.1.3 指令中的配置项介绍
inserted:被绑定元素插入父节点时调用的钩子函数,除了插入时,还有更新的钩子,updated。
el:使用指令的那个 DOM 元素。
1.1.4 代码示例
需求:当页面加载时,让元素获取焦点(autofocus在safari浏览器有兼容性)
App.vue
<div>
  <h1>自定义指令</h1>
  <input v-focus ref="inp" type="text">
</div>
1.2 指令的值 binding
1.2.1 需求
实现一个 color 指令 - 传入不同的颜色, 给标签设置文字颜色
1.2.2 语法
1.在绑定指令时,可以通过“等号”的形式为指令 绑定 具体的参数值
<div v-color="color">我是内容</div>2.通过 binding.value 可以拿到指令值,指令值修改会 触发 update 函数
directives: {
  color: {
    inserted (el, binding) {
      el.style.color = binding.value
    },
    update (el, binding) {
      el.style.color = binding.value
    }
  }
}
1.2.3 代码示例
App.vue
<template>
  <div>
     <!--显示红色-->
    <h2 v-color="color1">指令的值1测试</h2>
     <!--显示蓝色-->
    <h2 v-color="color2">指令的值2测试</h2>
     <button>
        改变第一个h1的颜色
    </button>
  </div>
</template>

<script>
export default {
  data () {
    return {
      color1: 'red',
      color2: 'blue'
    }
  }
}
</script>

<style>
</style>
1.3 v-loading 指令的封装
1.3.1 场景
实际开发过程中,发送请求需要时间,在请求的数据未回来时,页面会处于 空白状态 => 用户体验不好
1.3.2 需求
封装一个 v-loading 指令,实现加载中的效果
1.3.3 分析
1.本质 loading 效果就是一个蒙层,盖在了盒子上
2.数据请求中,开启 loading 状态,添加蒙层
3.数据请求完毕,关闭 loading 状态,移除蒙层
1.3.4 实现
1.准备一个 loading 类,通过伪元素定位,设置宽高,实现蒙层
2.开启关闭 loading 状态(添加移除蒙层),本质只需要 添加移除类 即可。
3.结合自定义指令的语法进行封装复用
.loading:before {
  content: "";
  position: absolute;
  left: 0;
  top: 0;
  width: 100%;
  height: 100%;
  background: #fff url("./loading.gif") no-repeat center;
}
5.准备代码
<template>
  <div class="main">
    <div class="box" v-loading="isLoading">
      <ul>
        <li v-for="item in list" :key="item.id" class="news">
          <div class="left">
            <div class="title">{{ item.title }}</div>
            <div class="info">
              <span>{{ item.source }}</span>
              <span>{{ item.time }}</span>
            </div>
          </div>

          <div class="right">
            <img :src="item.img" alt="">
          </div>
        </li>
      </ul>
    </div>
    <div class="box2" v-loading="isLoading2"></div>
  </div>
</template>

<script>
// 安装axios =>  yarn add axios
import axios from 'axios'

// 接口地址:http://hmajax.itheima.net/api/news
// 请求方式:get
export default {
  data() {
    return {
      list: [],
      isLoading: true,
      isLoading2: true,
    }
  },
  async created() {
    // 1. 发送请求获取数据
    const res = await axios.get('http://hmajax.itheima.net/api/news')

    setTimeout(() => {
      // 2. 更新到 list 中,用于页面渲染 v-for
      this.list = res.data.data
      this.isLoading = false
    }, 2000)
  },
  directives: {
    loading: {
      inserted(el, binding) {
        binding.value
          ? el.classList.add('loading')
          : el.classList.remove('loading')
      },
      update(el, binding) {
        binding.value
          ? el.classList.add('loading')
          : el.classList.remove('loading')
      },
    },
  },
}
</script>

<style>
.loading:before {
  content: '';
  position: absolute;
  left: 0;
  top: 0;
  width: 100%;
  height: 100%;
  background: #fff url('./loading.gif') no-repeat center;
}

.box2 {
  width: 400px;
  height: 400px;
  border: 2px solid #000;
  position: relative;
}

.box {
  width: 800px;
  min-height: 500px;
  border: 3px solid orange;
  border-radius: 5px;
  position: relative;
}
.news {
  display: flex;
  height: 120px;
  width: 600px;
  margin: 0 auto;
  padding: 20px 0;
  cursor: pointer;
}
.news .left {
  flex: 1;
  display: flex;
  flex-direction: column;
  justify-content: space-between;
  padding-right: 10px;
}
.news .left .title {
  font-size: 20px;
}
.news .left .info {
  color: #999999;
}
.news .left .info span {
  margin-right: 20px;
}
.news .right {
  width: 160px;
  height: 120px;
}
.news .right img {
  width: 100%;
  height: 100%;
  object-fit: cover;
}
</style>
2 插槽
2.1 默认插槽
2.1.1 作用
让组件内部的一些 结构 支持 自定义
2.1.2 需求
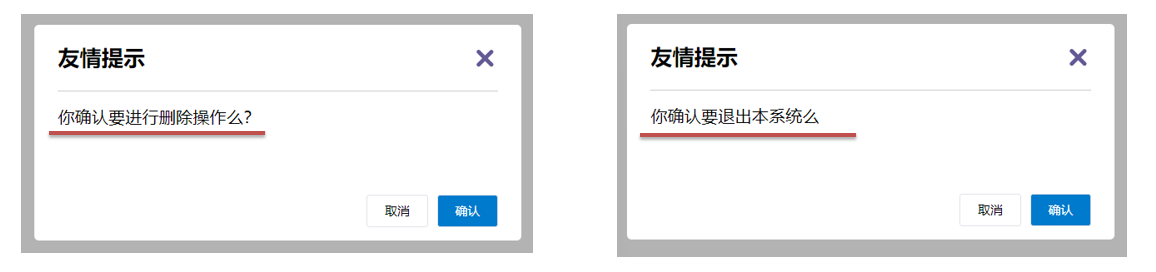
将需要多次显示的对话框,封装成一个组件。
2.1.3 问题
组件的内容部分,不希望写死,希望能使用的时候 自定义。
2.1.4 插槽的基本语法
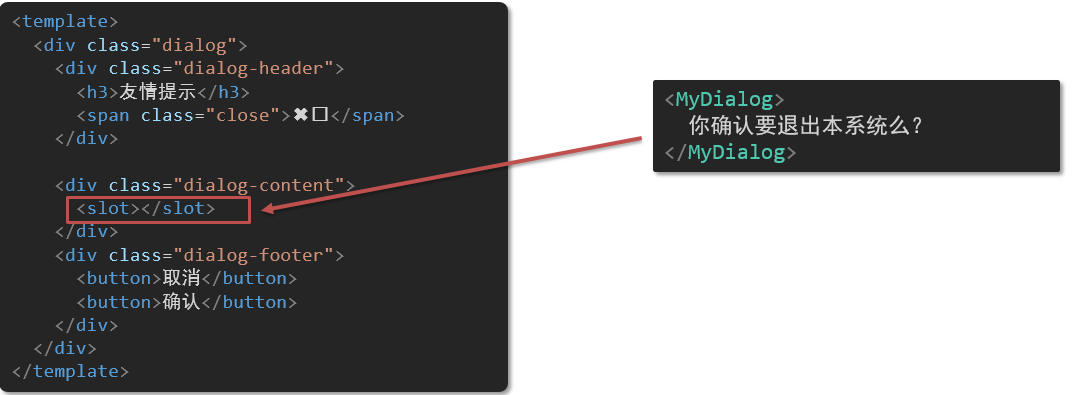
- 组件内需要定制的结构部分,改用
<slot></slot>占位 - 使用组件时,
<MyDialog></MyDialog>标签内部, 传入结构替换 slot - 给插槽传入内容时,可以传入 纯文本、html标签、组件
2.1.5 代码示例
MyDialog.vue
<template>
  <div class="dialog">
    <div class="dialog-header">
      <h3>友情提示</h3>
      <span class="close">✖️</span>
    </div>

    <div class="dialog-content">
      <!-- 1. 在需要定制的位置,使用slot占位 -->
      <slot></slot>
    </div>
    <div class="dialog-footer">
      <button>取消</button>
      <button>确认</button>
    </div>
  </div>
</template>

<script>
export default {
  data() {
    return {}
  },
}
</script>

<style scoped>
* {
  margin: 0;
  padding: 0;
}
.dialog {
  width: 470px;
  height: 230px;
  padding: 0 25px;
  background-color: #ffffff;
  margin: 40px auto;
  border-radius: 5px;
}
.dialog-header {
  height: 70px;
  line-height: 70px;
  font-size: 20px;
  border-bottom: 1px solid #ccc;
  position: relative;
}
.dialog-header .close {
  position: absolute;
  right: 0px;
  top: 0px;
  cursor: pointer;
}
.dialog-content {
  height: 80px;
  font-size: 18px;
  padding: 15px 0;
}
.dialog-footer {
  display: flex;
  justify-content: flex-end;
}
.dialog-footer button {
  width: 65px;
  height: 35px;
  background-color: #ffffff;
  border: 1px solid #e1e3e9;
  cursor: pointer;
  outline: none;
  margin-left: 10px;
  border-radius: 3px;
}
.dialog-footer button:last-child {
  background-color: #007acc;
  color: #fff;
}
</style>
App.vue
<template>
  <div>
    <!-- 2. 在使用组件时,组件标签内填入内容 -->
    <MyDialog>
      <div>你确认要删除么</div>
    </MyDialog>

    <MyDialog>
      <p>你确认要退出么</p>
    </MyDialog>
  </div>
</template>

<script>
import MyDialog from './components/MyDialog.vue'
export default {
  data() {
    return {}
  },
  components: {
    MyDialog,
  },
}
</script>

<style>
body {
  background-color: #b3b3b3;
}
</style>
2.2 后备内容(默认值)
2.2.1 问题
通过插槽完成了内容的定制,传什么显示什么, 但是如果不传,则是空白
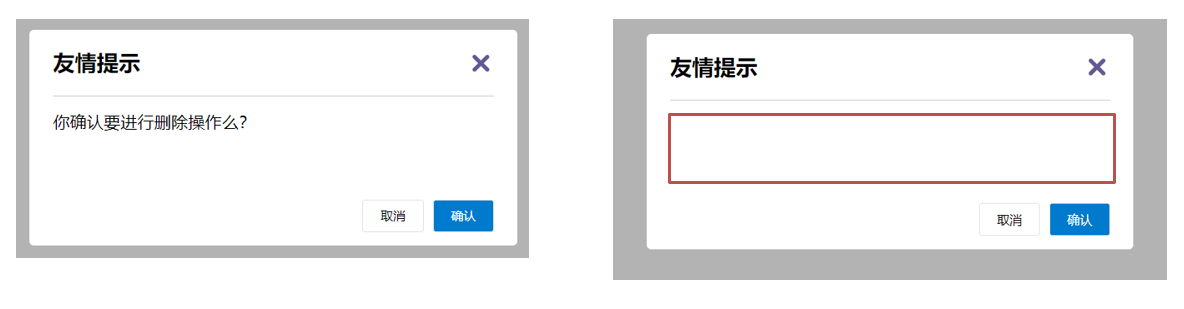
能否给插槽设置 默认显示内容 呢?
2.2.2 插槽的后备内容
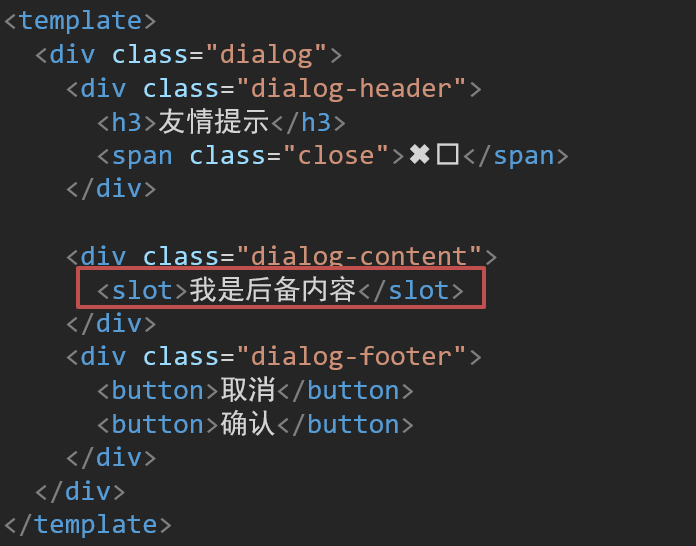
封装组件时,可以为预留的 <slot> 插槽提供后备内容(默认内容)。
2.2.3 语法
在 <slot> 标签内,放置内容, 作为默认显示内容
2.2.4 效果
-
外部使用组件时,不传东西,则 slot 会显示后备内容

-
外部使用组件时,传东西了,则 slot 整体会被换掉

2.2.5 代码示例
App.vue
<template>
  <div>
    <MyDialog></MyDialog>

    <MyDialog>
      你确认要退出么
    </MyDialog>
  </div>
</template>

<script>
import MyDialog from './components/MyDialog.vue'
export default {
  data() {
    return {}
  },
  components: {
    MyDialog,
  },
}
</script>

<style>
body {
  background-color: #b3b3b3;
}
</style>
MyDialog.vue
<template>
  <div class="dialog">
    <div class="dialog-header">
      <h3>友情提示</h3>
      <span class="close">✖️</span>
    </div>

    <div class="dialog-content">
      <!-- 往slot标签内部,编写内容,可以作为后备内容(默认值) -->
      <slot>
        我是默认的文本内容
      </slot>
    </div>
    <div class="dialog-footer">
      <button>取消</button>
      <button>确认</button>
    </div>
  </div>
</template>

<script>
export default {
  data() {
    return {}
  },
}
</script>

<style scoped>
* {
  margin: 0;
  padding: 0;
}
.dialog {
  width: 470px;
  height: 230px;
  padding: 0 25px;
  background-color: #ffffff;
  margin: 40px auto;
  border-radius: 5px;
}
.dialog-header {
  height: 70px;
  line-height: 70px;
  font-size: 20px;
  border-bottom: 1px solid #ccc;
  position: relative;
}
.dialog-header .close {
  position: absolute;
  right: 0px;
  top: 0px;
  cursor: pointer;
}
.dialog-content {
  height: 80px;
  font-size: 18px;
  padding: 15px 0;
}
.dialog-footer {
  display: flex;
  justify-content: flex-end;
}
.dialog-footer button {
  width: 65px;
  height: 35px;
  background-color: #ffffff;
  border: 1px solid #e1e3e9;
  cursor: pointer;
  outline: none;
  margin-left: 10px;
  border-radius: 3px;
}
.dialog-footer button:last-child {
  background-color: #007acc;
  color: #fff;
}
</style>
2.3 具名插槽
2.3.1 需求
一个组件内有多处结构,需要外部传入标签,进行定制 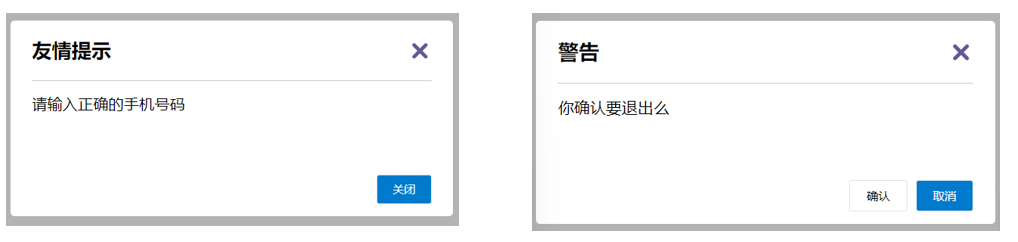
上面的弹框中有 三处不同,但是 默认插槽 只能 定制一个位置,这时候怎么办呢?
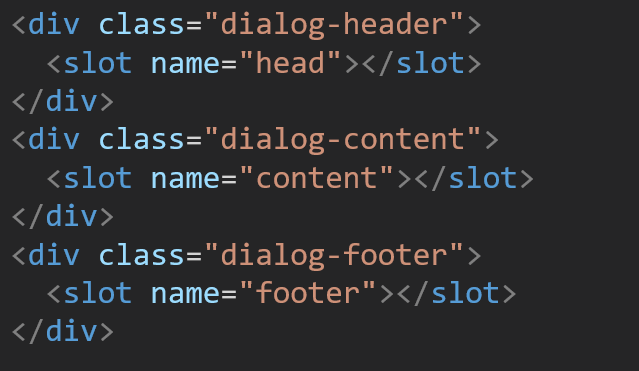
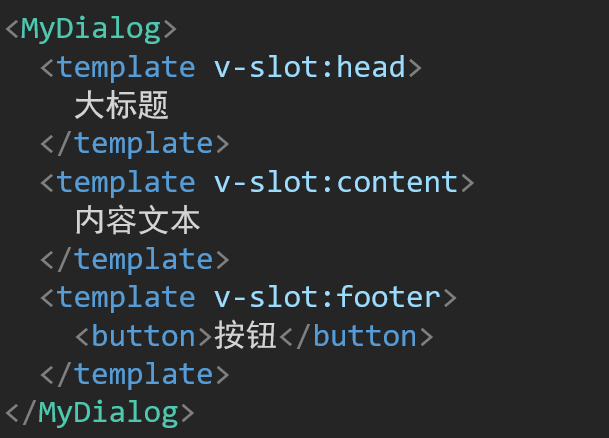
2.3.2 具名插槽语法
-
多个 slot 使用 name 属性区分名字
-
template 配合 v-slot:名字 来分发对应标签
2.3.3 v-slot 的简写
v-slot 写起来太长,vue 给我们提供一个简单写法 v-slot —> #,例如 #footer
2.4 作用域插槽
2.4.1 插槽分类
-
默认插槽
-
具名插槽
插槽只有两种,作用域插槽不属于插槽的一种分类
2.4.2 作用
定义slot 插槽的同时, 是可以 传值 的。给 插槽 上可以 绑定数据,将来 使用组件时可以用
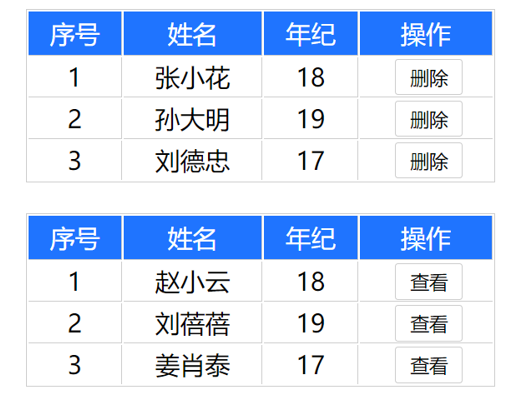
2.4.3 场景
封装表格组件
2.4.4 使用步骤
-
给 slot 标签, 以 添加属性的方式传值
<slot :id="item.id" msg="测试文本"></slot> -
所有添加的属性, 都会被收集到一个对象中
{ id: 3, msg: '测试文本' } -
在template中, 通过
#插槽名= "obj"接收,默认插槽名为default<MyTable :list="list"> <template #default="obj"> <button @click="del(obj.id)">删除</button> </template> </MyTable>
3 综合案例 - 商品列表-MyTag 组件抽离
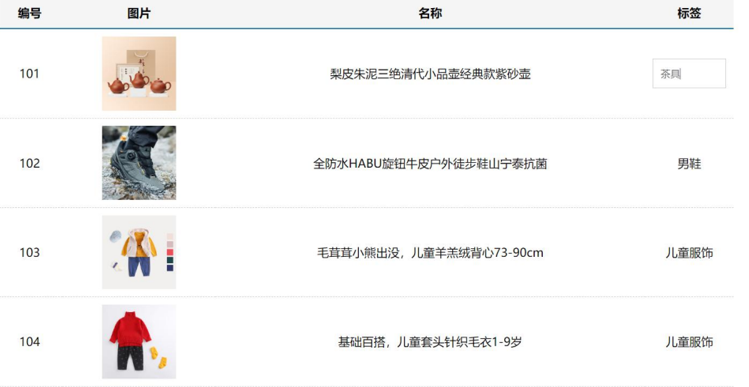
3.1 需求说明
- my-tag 标签组件封装
(1) 双击显示输入框,输入框获取焦点
(2) 失去焦点,隐藏输入框
(3) 回显标签信息
(4) 内容修改,回车 → 修改标签信息
- my-table 表格组件封装
(1) 动态传递表格数据渲染
(2) 表头支持用户自定义
(3) 主体支持用户自定义
3.2 代码展示
main.js
import Vue from 'vue'
import App from './App.vue'

Vue.config.productionTip = false

// 封装全局指令 focus
Vue.directive('focus', {
  // 指令所在的dom元素,被插入到页面中时触发
  inserted(el) {
    el.focus()
  }
})


new Vue({
  render: h => h(App),
}).$mount('#app')
App.vue
控制页面的整体显示,包括表头和表体。
<template>
  <div class="table-case">
    <MyTable :data="goods">
      <template #head>
        <th>编号</th>
        <th>名称</th>
        <th>图片</th>
        <th width="100px">标签</th>
      </template>

      <template #body="{ item, index }">
        <td>{{ index + 1 }}</td>
        <td>{{ item.name }}</td>
        <td>
          <img :src="item.picture" />
        </td>
        <td>
          <MyTag v-model="item.tag"></MyTag>
        </td>
      </template>
    </MyTable>
  </div>
</template>

<script>
// my-tag 标签组件的封装
// 1. 创建组件 - 初始化
// 2. 实现功能
//    (1) 双击显示,并且自动聚焦
//        v-if v-else @dbclick 操作 isEdit
//        自动聚焦:
//        1. $nextTick => $refs 获取到dom,进行focus获取焦点
//        2. 封装v-focus指令

//    (2) 失去焦点,隐藏输入框
//        @blur 操作 isEdit 即可

//    (3) 回显标签信息
//        回显的标签信息是父组件传递过来的
//        v-model实现功能 (简化代码)  v-model => :value 和 @input
//        组件内部通过props接收, :value设置给输入框

//    (4) 内容修改了,回车 => 修改标签信息
//        @keyup.enter, 触发事件 $emit('input', e.target.value)

// ---------------------------------------------------------------------

// my-table 表格组件的封装
// 1. 数据不能写死,动态传递表格渲染的数据  props
// 2. 结构不能写死 - 多处结构自定义 【具名插槽】
//    (1) 表头支持自定义
//    (2) 主体支持自定义

import MyTag from './components/MyTag.vue'
import MyTable from './components/MyTable.vue'
export default {
  name: 'TableCase',
  components: {
    MyTag,
    MyTable,
  },
  data() {
    return {
      goods: [
        {
          id: 101,
          picture:
            'https://yanxuan-item.nosdn.127.net/f8c37ffa41ab1eb84bff499e1f6acfc7.jpg',
          name: '梨皮朱泥三绝清代小品壶经典款紫砂壶',
          tag: '茶具',
        },
        {
          id: 102,
          picture:
            'https://yanxuan-item.nosdn.127.net/221317c85274a188174352474b859d7b.jpg',
          name: '全防水HABU旋钮牛皮户外徒步鞋山宁泰抗菌',
          tag: '男鞋',
        },
        {
          id: 103,
          picture:
            'https://yanxuan-item.nosdn.127.net/cd4b840751ef4f7505c85004f0bebcb5.png',
          name: '毛茸茸小熊出没,儿童羊羔绒背心73-90cm',
          tag: '儿童服饰',
        },
        {
          id: 104,
          picture:
            'https://yanxuan-item.nosdn.127.net/56eb25a38d7a630e76a608a9360eec6b.jpg',
          name: '基础百搭,儿童套头针织毛衣1-9岁',
          tag: '儿童服饰',
        },
      ],
    }
  },
}
</script>

<style lang="less" scoped>
.table-case {
  width: 1000px;
  margin: 50px auto;
  img {
    width: 100px;
    height: 100px;
    object-fit: contain;
    vertical-align: middle;
  }
}
</style>
MyTag.vue
<template>
  <div class="my-tag">
    <input v-if="isEdit" v-focus ref="inp" class="input" type="text" placeholder="输入标签"
      :value="value" @blur="isEdit = false" @keyup.enter="handleEnter" />
    <div v-else @dblclick="handleClick" class="text">
      {{ value }}
    </div>
  </div>
</template>

<script>
export default {
  props: {
    value: String,
  },
  data() {
    return {
      isEdit: false,
    }
  },
  methods: {
    handleClick() {
      // 双击后,切换到显示状态 (Vue是异步dom更新)
      this.isEdit = true

      // // 等dom更新完了,再获取焦点
      // this.$nextTick(() => {
      //   // 立刻获取焦点
      //   this.$refs.inp.focus()
      // })
    },
    handleEnter(e) {
      // 非空处理
      if (e.target.value.trim() === '') return alert('标签内容不能为空')

      // 子传父,将回车时,[输入框的内容] 提交给父组件更新
      // 由于父组件是v-model,触发事件,需要触发 input 事件
      this.$emit('input', e.target.value)
      // 提交完成,关闭输入状态
      this.isEdit = false
    },
  },
}
</script>

<style lang="less" scoped>
.my-tag {
  cursor: pointer;
  .input {
    appearance: none;
    outline: none;
    border: 1px solid #ccc;
    width: 100px;
    height: 40px;
    box-sizing: border-box;
    padding: 10px;
    color: #666;
    &::placeholder {
      color: #666;
    }
  }
}
</style>
MyTable.vue
<template>
  <table class="my-table">
    <thead>
      <tr>
        <slot name="head"></slot>
      </tr>
    </thead>
    <tbody>
      <tr v-for="(item, index) in data" :key="item.id">
        <slot name="body" :item="item" :index="index"></slot>
      </tr>
    </tbody>
  </table>
</template>

<script>
export default {
  props: {
    data: {
      type: Array,
      required: true,
    },
  },
}
</script>

<style lang="less" scoped>
.my-table {
  width: 100%;
  border-spacing: 0;
  img {
    width: 100px;
    height: 100px;
    object-fit: contain;
    vertical-align: middle;
  }
  th {
    background: #f5f5f5;
    border-bottom: 2px solid #069;
  }
  td {
    border-bottom: 1px dashed #ccc;
  }
  td,
  th {
    text-align: center;
    padding: 10px;
    transition: all 0.5s;
    &.red {
      color: red;
    }
  }
  .none {
    height: 100px;
    line-height: 100px;
    color: #999;
  }
}
</style>
4 路由入门
4.1 单页应用程序介绍
单页应用程序:SPA【Single Page Application】是指所有的功能都在 一个html页面 上实现
2.具体示例
单页应用网站: 网易云音乐 https://music.163.com/
多页应用网站:京东 https://jd.com/
3.单页应用 VS 多页面应用
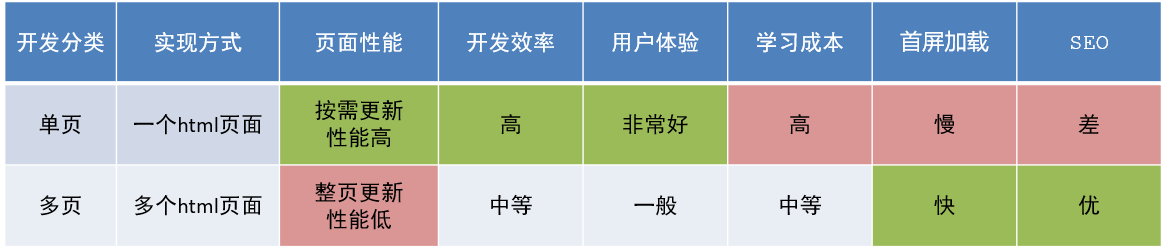
单页应用类网站:系统类网站 / 内部网站 / 文档类网站 / 移动端站点
多页应用类网站:公司官网 / 电商类网站
4.2 路由介绍
4.2.1 思考
单页面应用程序,之所以开发效率高,性能好,用户体验好
最大的原因就是:页面按需更新
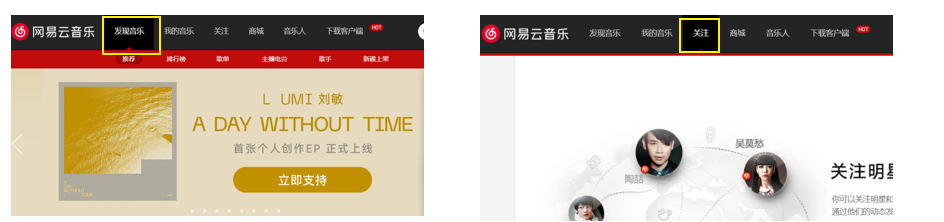
比如当点击【发现音乐】和【关注】时,只是更新下面部分内容,对于头部是不更新的
要按需更新,首先就需要明确:访问路径 和 **组件 **的对应关系!
访问路径 和 组件的对应关系如何确定呢? 路由
4.2.2 路由的介绍
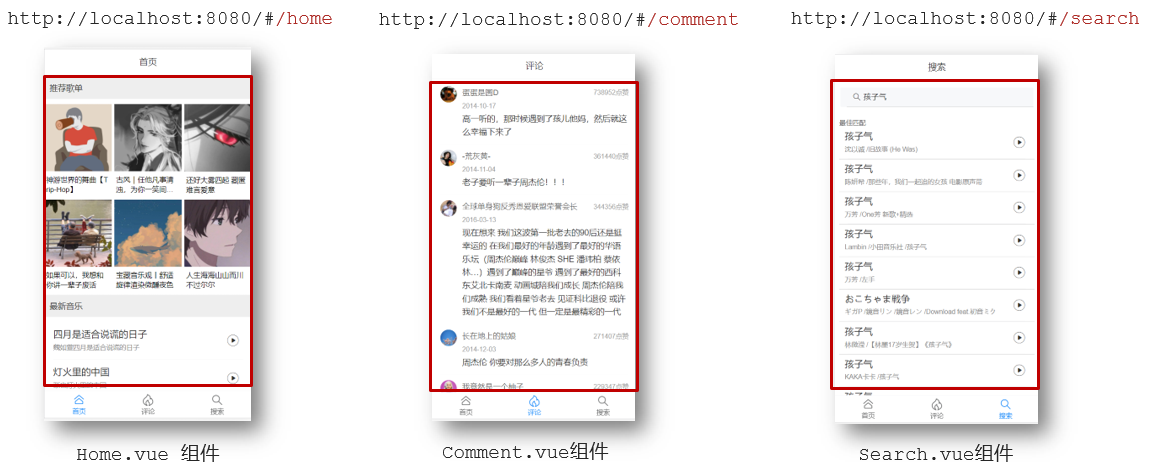
生活中的路由:设备和 ip 的映射关系
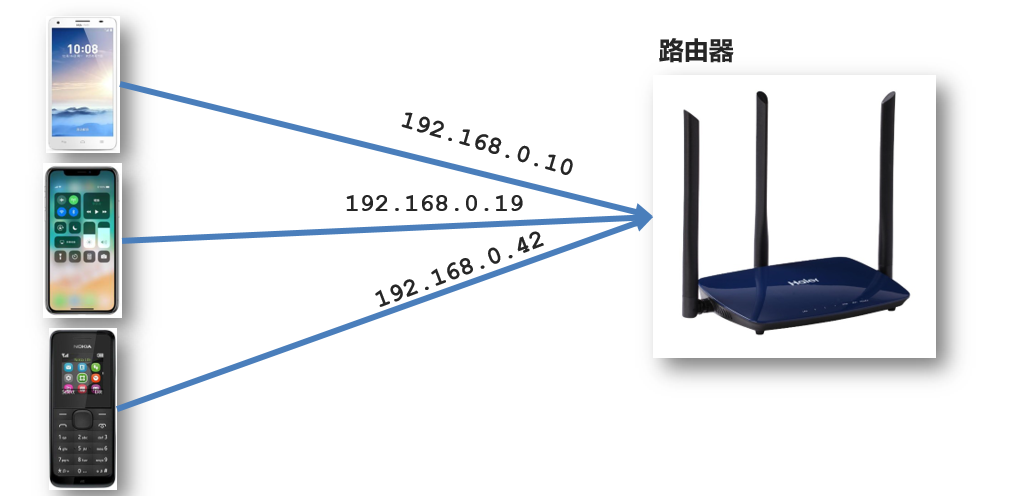
Vue中的路由:**路径和组件 **的 映射 关系
4.3 路由插件 VueRouter
4.3.1 介绍
VueRouter 是 Vue 官方的一个路由插件,是一个第三方包。能够在 修改 地址栏路径时,**切换显示 **匹配的 组件
官网
https://v3.router.vuejs.org/zh/
4.3.2 VueRouter的使用(5+2)
固定5个固定的步骤(不用死背,熟能生巧)
-
下载 VueRouter 模块到当前工程,版本3.6.5(233 344,Vue2 对应的 VueRouter 和 Vuex 对应的版本是 3。而 Vue3 对应的两个插件大版本都是 4)
yarn add vue-router@3.6.5 -
main.js 中引入 VueRouter
import VueRouter from 'vue-router' -
安装注册
Vue.use(VueRouter) -
创建路由对象
const router = new VueRouter() -
注入,将路由对象注入到 new Vue 实例中,建立关联
new Vue({
  render: h => h(App),
  router:router
}).$mount('#app')
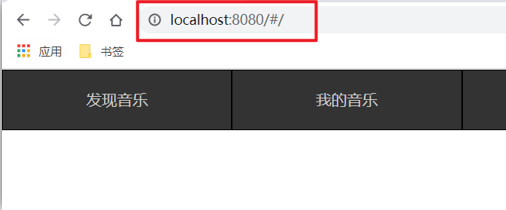
当我们配置完以上5步之后 就可以看到浏览器地址栏中的路由 变成了 /#/的形式。表示项目的路由已经被 Vue-Router 管理了
4.3.3 代码示例
main.js
// 路由的使用步骤 5 + 2
// 5个基础步骤
// 1. 下载 v3.6.5
// yarn add vue-router@3.6.5
// 2. 引入
// 3. 安装注册 Vue.use(Vue插件)
// 4. 创建路由对象
// 5. 注入到new Vue中,建立关联


import VueRouter from 'vue-router'
Vue.use(VueRouter) // VueRouter插件初始化

// 这里推荐使用router命名,注入时可以直接简写
const router = new VueRouter()

new Vue({
  render: h => h(App),
  router
}).$mount('#app')
4.3.4 两个核心步骤
-
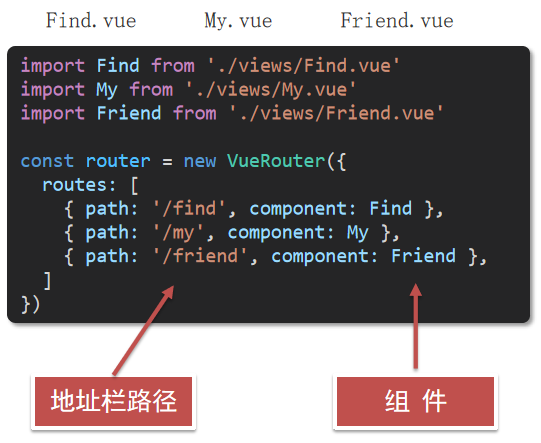
创建需要的组件 (views 目录),配置路由规则
-
配置导航,配置路由出口(路径匹配的组件显示的位置)
App.vue
<div class="footer_wrap">
  <!-- 这里需要携带#号 -->
  <a href="#/find">发现音乐</a>
  <a href="#/my">我的音乐</a>
  <a href="#/friend">朋友</a>
</div>
<div class="top">
  <router-view></router-view>
</div>
4.4 组件的存放目录问题
注意: .vue文件 本质无区别
4.4.1 组件分类
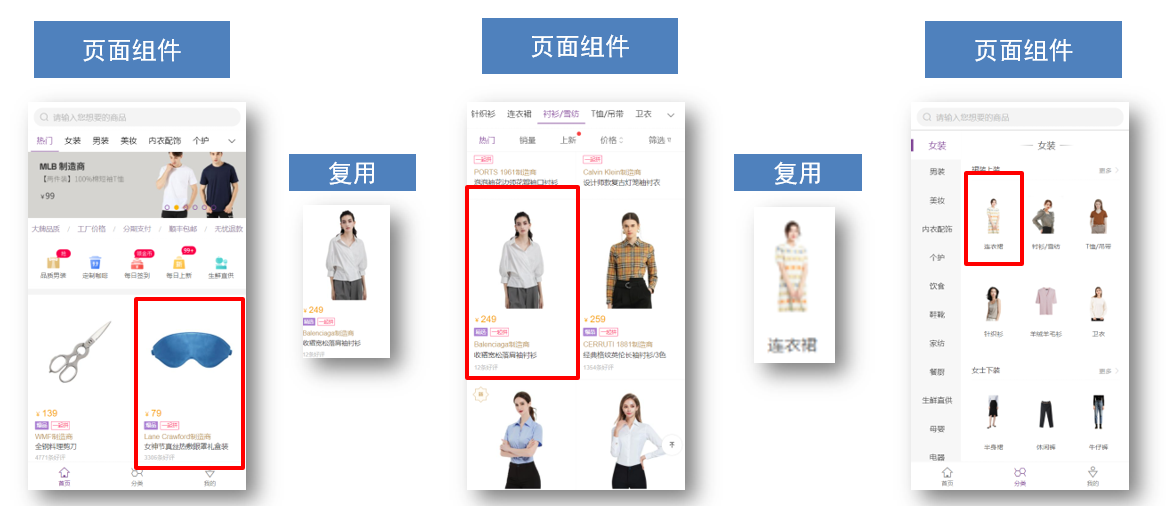
.vue文件分为2类,都是 .vue文件(本质无区别)
- 页面组件 (配置路由规则时使用的组件)
- 复用组件(多个组件中都使用到的组件)
4.4.2 存放目录
分类开来的目的就是为了 更易维护
-
src/views文件夹
页面组件 - 页面展示 - 配合路由用
-
src/components文件夹
复用组件 - 展示数据 - 常用于复用
4.4.3 路由的封装抽离
问题:所有的路由配置都在main.js中合适吗?
目标:将路由模块抽离出来。 好处:拆分模块,利于维护
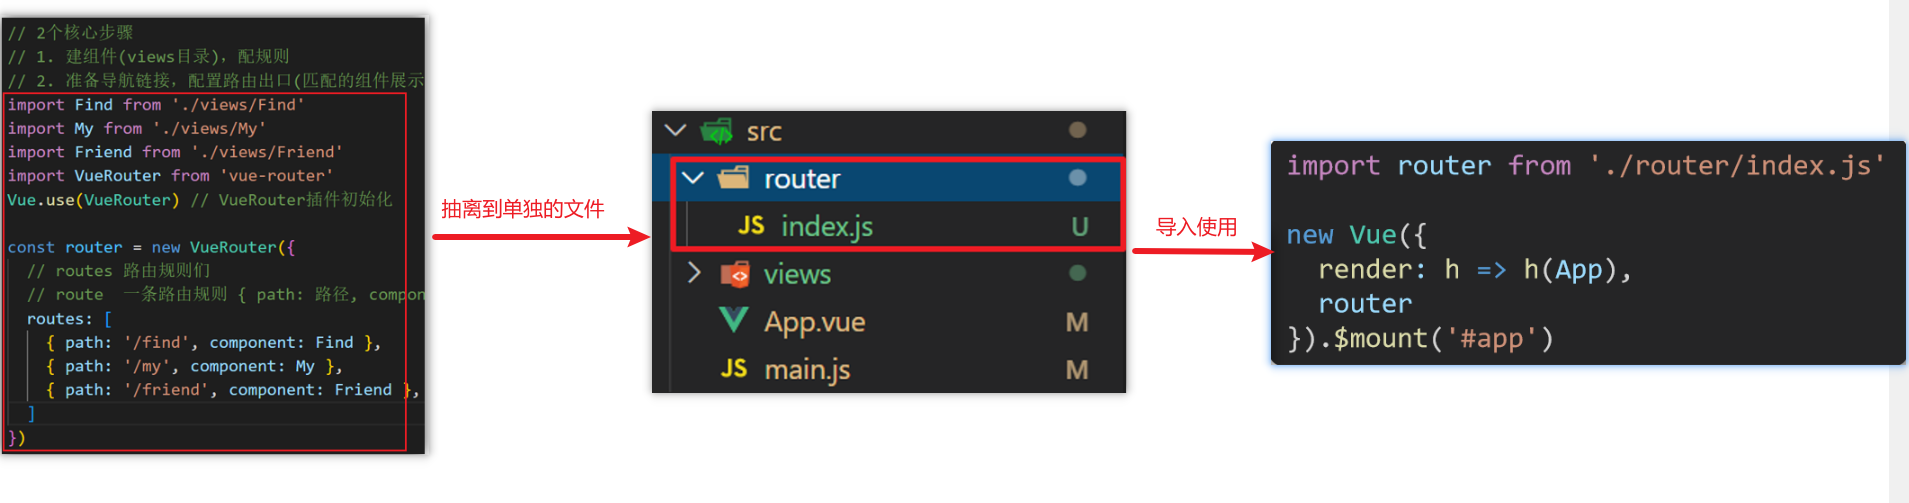
路径简写:
脚手架环境下 @指代src目录,可以用于快速引入组件